
View the original article on Reddit by Prelaunch Club.
Kickstarter Follower Ads Overview
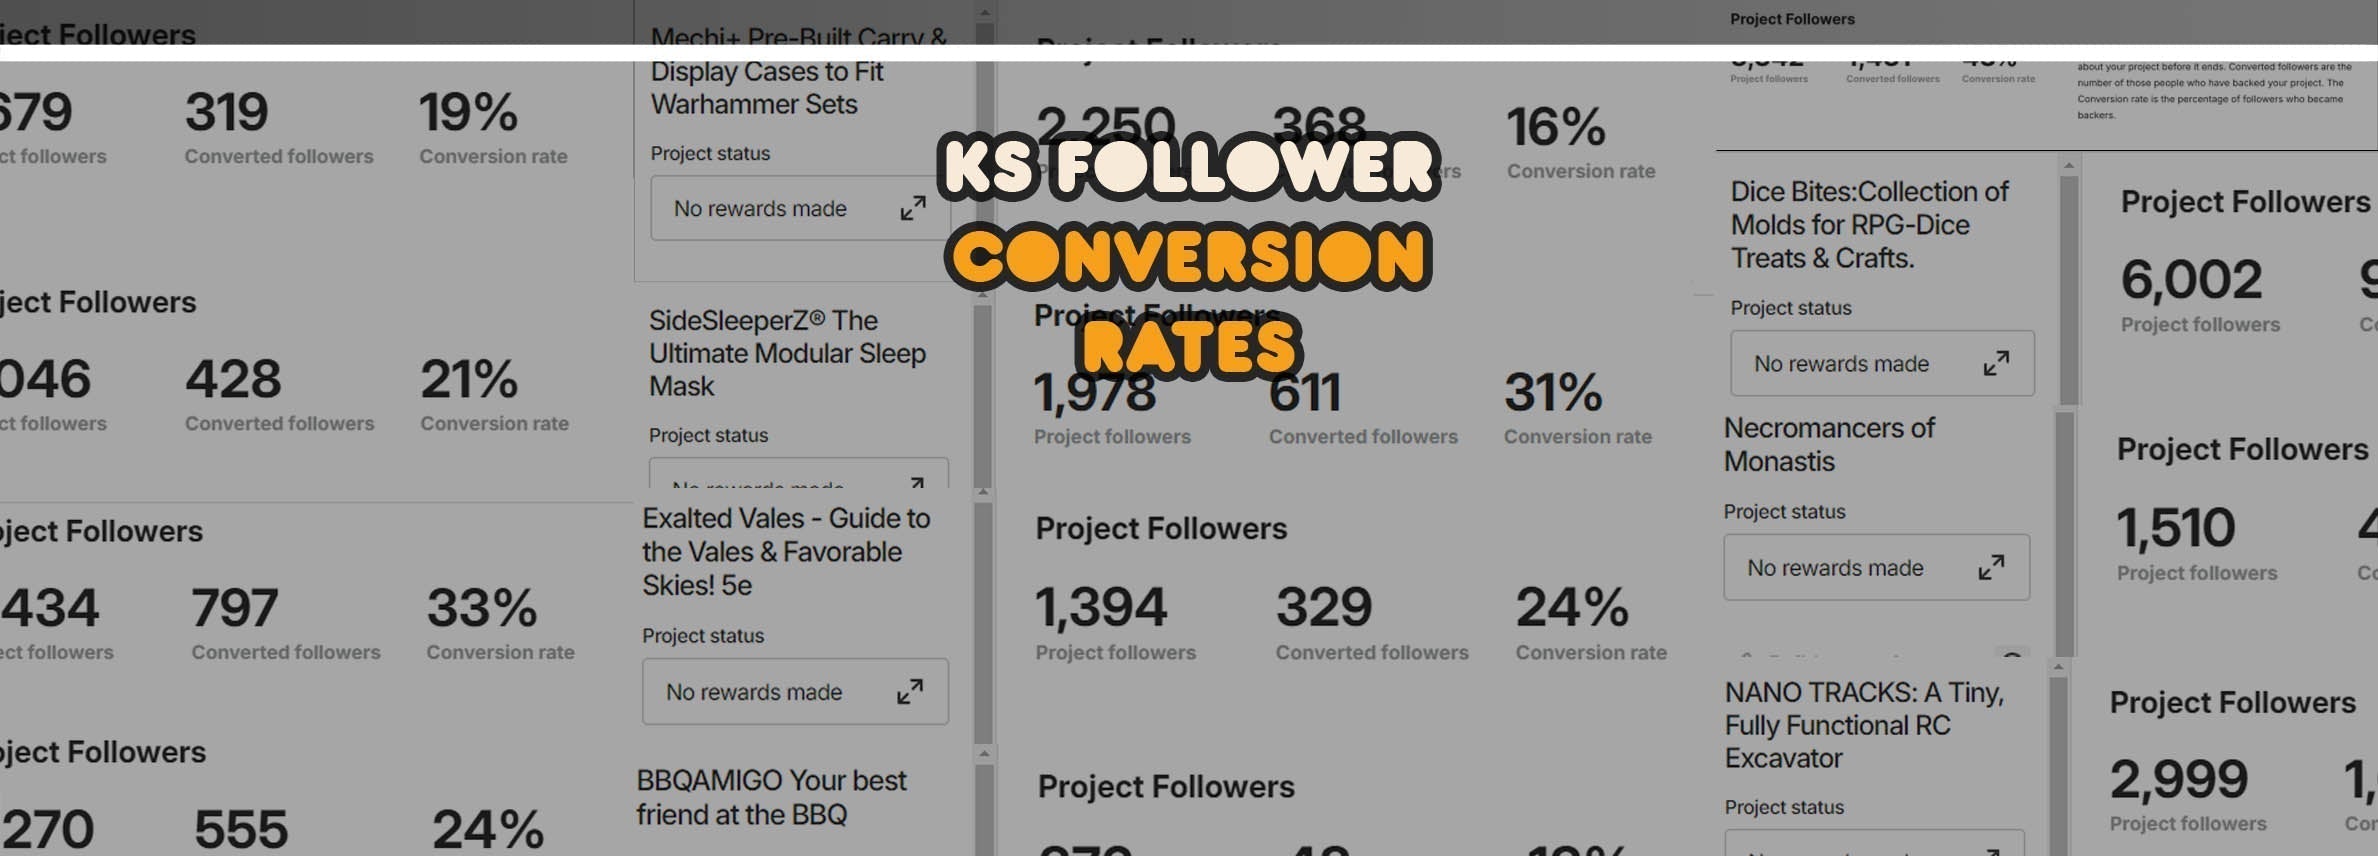
Kickstarter followers convert into backers at a high rate (20% to 40%), and the total number of followers also acts as a signal to Kickstarter’s editors for the “Projects We Love” selection process.
There are two options for acquiring Kickstarter Followers: your own website landing page, or a Kickstarter Pre-Launch Page hosted on Kickstarter itself.
Kickstarter Followers are cheapest to acquire by sending traffic directly to the Kickstarter website’s Pre-Launch Page.
If you want to collect Kickstarter Followers by using your own website, include a “Follow On Kickstarter” button in your Landing Page’s hero banner:

Facebook Account Setup
First, begin by creating a Business Account with Facebook:
-
Go to business.facebook.com/create and select Create Account.
- Follow the prompts to create your business account.
Walkthrough Video
You can watch a walkthrough video of setting up a Facebook Business, here.
Business Suite vs. Business Settings
The next steps involve accessing Business Settings. Go to business.facebook.com/settings to get to your Business Settings.
If you arrive at Business Suite instead (i.e. the URL is redirected to https://business.facebook.com/latest/settings), press the “Settings” button on the left pop-out menu to get to Business Settings:

Facebook Page
Follow these steps to add or create a page for your Business:
-
Go to business.facebook.com/settings and click “Pages” under Accounts in the left menu
- Press the blue “Add” button, and select either “Add a Page” or “Create a new Page”

Facebook Ad Account
You will need an Ad Account to run your ads from.
Follow these steps to create a new ad account in your Business:
-
Go to business.facebook.com/settings and click “Ad accounts” in the left menu
-
Press the blue “Add” button and select “Create a new ad account”
NOTE: if you can’t see the “Create” option, try zooming out your browser by pressing and holding the “CTRL” key on your keyboard while scrolling the mouse wheel.
- Follow the prompts to name the ad account, time zone, etc.

Facebook Dataset Pixel
The easiest way to create a pixel is via Business Manager, follow these steps:
- Go to Business Settings in Business Manager.
- Select your business.
- Click Data Sources.
- Select Datasets.
- Click Add by the search bar at the top of the page.
- Type in a name for your pixel dataset.
- Click Continue.
After you have created a new pixel dataset with the above steps, press “Add assets” and select your Ad Account to connect them together:
![]()
Setting Up Facebook Pixel for Kickstarter
Walkthrough Video
To begin the Kickstarter Pixel Setup, you will first need to create a Pre-Launch Page on Kickstarter for your project and submit it for approval, then add a Meta Pixel to your Kickstarter page. To improve tracking, you can use the Facebook Event Setup Tool to apply Button Tracking for Kickstarter.
You can watch a walkthrough video of using the Event Setup Tool, here.
Create a Kickstarter Pre-Launch Page
If you do not have a Kickstarter Pre-Launch Page, follow this step-by-step guide in the official Kickstarter documentation, here.
You will need to submit the campaign for approval first before being able to create a Kickstarter Pre-Launch Page.
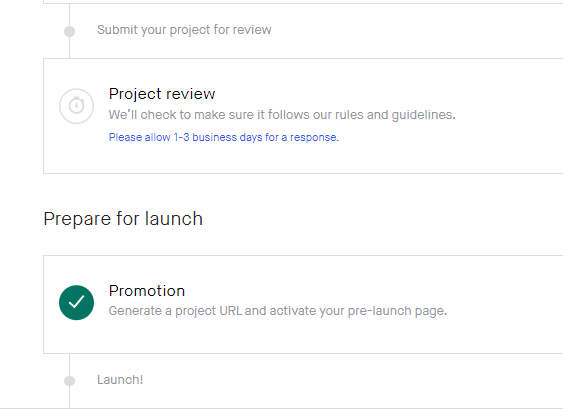
In order to submit the campaign for approval, all you have to do is simply customize the Kickstarter project’s “Basic” details (the Title, Subtitle, Image). Add at least 1 reward tier, a short rough draft of the "Story" (must include photos) and banking details.
Be sure to include photos or screenshots of the actual real-life prototype, along with photos that document the prototyping journey. They want to see that it is an original idea, and a real product. Kickstarter will not approve projects that only feature wireframes or 3D renders.
Add the Facebook Pixel to Kickstarter
You can add the Facebook Pixel to Kickstarter by navigating to the Promotion tab in your Kickstarter project editor:
Then, scroll down to the “Meta Pixel” field, and insert the Meta Pixel ID:
![]()
Your Meta Pixel ID can be found in Business Manager -> Data Sources -> Datasets, and the ID is located beneath the name of the Pixel:![]()
Now that you’ve inserted the Pixel ID into the Kickstarter Project Editor, Kickstarter will automatically start sending “Lead” events to Facebook when somebody presses the “Notify Me On Launch” button!
How To Enhance Kickstarter Follower Tracking
The majority of users will take alternative user-journey pathways than just simply the “Notify Me” button. For an overview on the Kickstarter Follower pixel tracking issue, here are the potential user journey pathways:
- Notify Me → Already Logged In → KS Fires a lead event automatically
- Notify Me → Needs to Log In → They Sign In successfully → return to page without UTM Parameter, but they are automatically followed to the campaign and tracking is lost
- Press "Log In" → They successfully Sign In → They are returned back to the KS Prelaunch Page → They press "Notify Me" and KS Fires a lead event automatically
- Press "Open" → They open the app where they are signed in → tracking is lost
- Press "Install App" → They are taken to the app store → tracking is lost
Here are the tracking solutions required using the Event Setup Tool for each of the user journey pathways above, respectively:
- No special tracking needed
- URL-based Tracking required (not covered here)
- No special tracking needed
- Event must be tied to the "Open" Button
- Event must be tied to the "Install App" button
The most balanced tracking solution you can deploy for Kickstarter Followers is to include the “Open” button in the Event Setup Tool. It is the most stable button that you can target which will not produce duplicate events or fail with Ad Blockers.
Button Tracking Using the Event Setup Tool
The first step is to go to the Facebook Event Manager and then to the "Settings" tab. Here, you will find the button "Open Event Setup Tool". Press it, and insert the URL website link for your Kickstarter Prelaunch Page: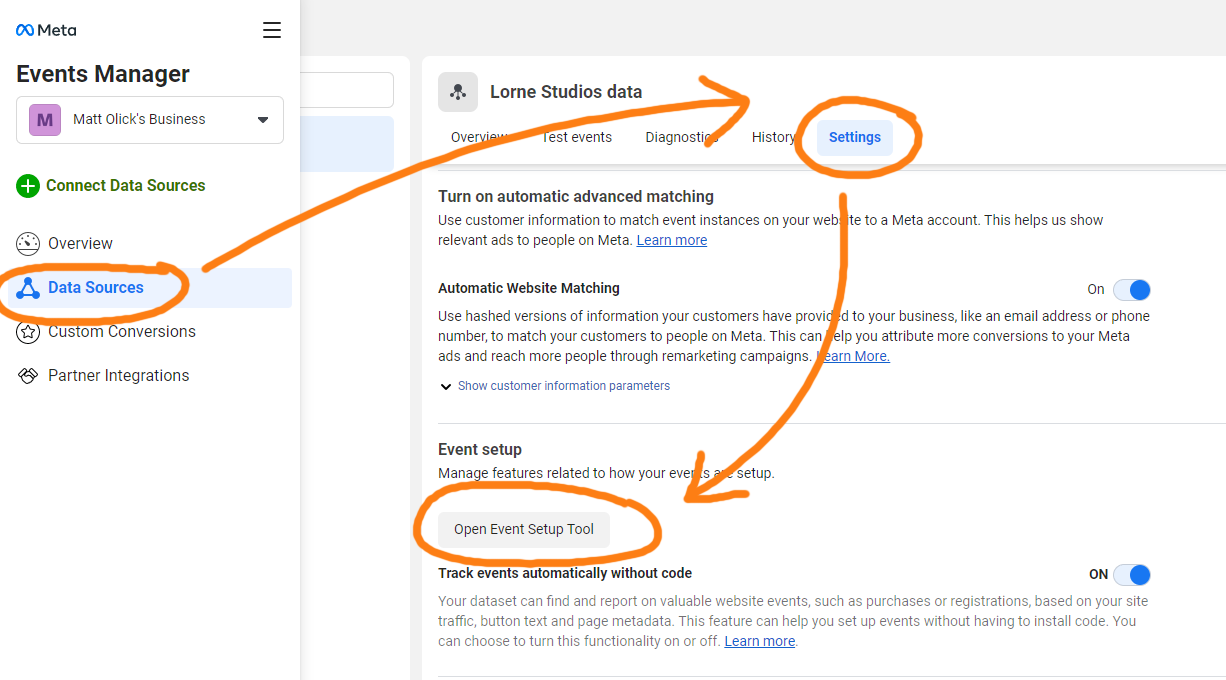
Press the button to Open the Event Setup Tool, and insert the URL website link for your public Kickstarter Prelaunch Page:
IMPORTANT NOTE, IF YOU CAN'T SEE THE EVENT SETUP TOOL: Make sure to disable any pop-up blockers. If you still cannot see the Event Setup Tool popup, try using Chrome browser.
Also, it seems the Event Setup Tool only works for users based within the USA.
This solution was created by my Discord community:
https://discord.gg/5beFSFs8ds
FORWARD: Please be considerate of the various privacy laws in your own country, as this Facebook restriction may be related to that -- in no way should the following instructions be construed as me directing you to do this activity, and executing the following VPN instructions is solely at your own discretion.
INSTRUCTIONS: Instructions for anybody reading with the same issue:
- install a VPN and connect to US
- logout from Kickstarter
- clear the cookies of the browser and cache (very important)
- rerun the browser in incognito mode with VPN on
Button Tracking For Kickstarter
To improve the accuracy of your Facebook Pixel tracking for Kickstarter Followers, you can assign a “Lead” Pixel Event to the “Open” button on your Kickstarter Pre-Launch page.
The “Open” button is only visible on mobile phones, and the Facebook Event Setup Tool does not work on mobile phones. To solve this incompatibility, we must rename the button text on any website with your Facebook Pixel attached. We can technically use the Kickstarter Pre-Launch Page for this purpose by using the Inspector within any common internet browser.
NOTE: This technique works because the Event Setup Tool relies upon the text content of the button to fire an event. It is not dependent on the URL. This means that if you label a button "Open" on your own website with the Facebook Pixel attached, it will also fire the event on your own website whenever somebody presses a button with the same “Open” button-text.
To rename any button text in your web browser, right-click any button on the Kickstarter Prelaunch Page while using the Event Setup Tool. Right-clicking the button will open your browser’s context menu, and then press "Inspect".
This brings you immediately to the button text in the HTML code, or the parent element above it. Double click the text and rewrite it to say "Open":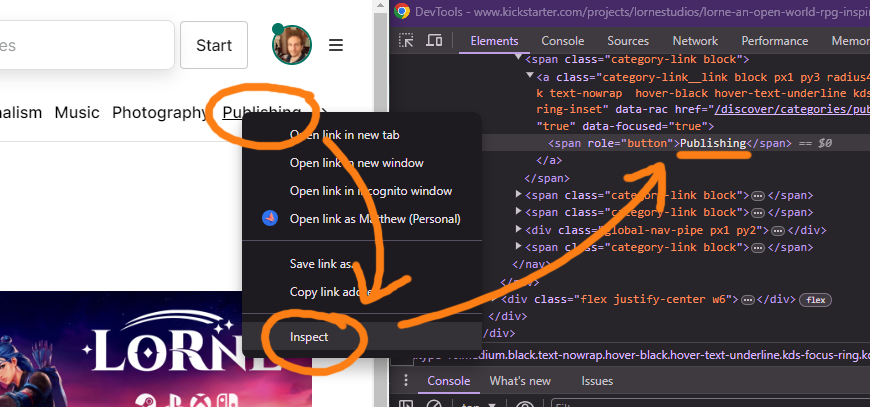
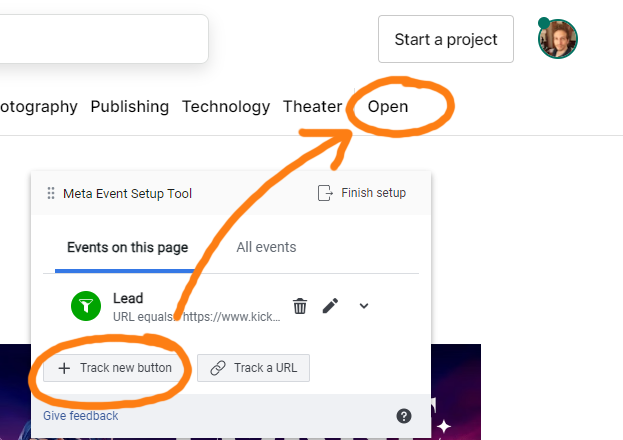
Now that we re-named the button label, use the Event Setup Tool as normal by pressing the "Track new button" button, and selecting the new button we created that says 'Open':
After clicking the “Open” button, it will popup to ask which type of Event you’d like to assign to the button. Choose the “Lead” event from the dropdown menu.
*OPTIONAL, "Log In" Button Tracking: You can repeat these steps to assign a “Lead” event to the “Log In” button. Tracking the "Log In" button tends to be most effective when your product’s target audience overlaps heavily with the general Kickstarter community, such as: tech hardware, board games, video games, etc.
IMPORTANT: "Log In" button tracking will produce extra events. These duplicate events are what may further optimize the Facebook Ads algorithm for Kickstarter Users, and can be beneficial. If you are getting too many extra events (i.e. 2x or more events than real followers) and have applied this tracking method, consider removing the optional "Log In" button method.
Once finished with the Event Setup Tool, press confirm, then “Finish Setup”.
Closing Thoughts
Verify your pixel is working with the "Meta Pixel Helper" browser-plugin:
https://developers.facebook.com/docs/meta-pixel/support/pixel-helper/
Your pixel is now setup and ready to roll ads!
Dig deeper: How to setup Facebook Ads for Kickstarter


Conversation
💬
@Alberto Dianin, Correct.
If you are using URL Tracking, make sure to use the special Destination URL (as shown at the end of the above article) in your ads to prevent tripping your own tracking against special ad-blockers and some newer iPhones.
I’d like to repeat a word of caution against using “Log-in” button tracking unless you are doing a board game or D&D project which are categories that have high concentrations of superbackers. If your project is within these categories, then from my experience it is a relatively safe move to try as it seems to improve the overall real cost-per-follower.
Hi Matt,
So we’ll use this link on every ad that points to the Kickstarter prelaunch page and, in addition, we’ll add tracking for the “Open” and “Log in” buttons. Meanwhile, tracking for the “Notify me on launch” button is automatic and doesn’t need to be added, right?